Wednesday, May 2, 2012

Review: China Glaze Magnetix Nailpolishes

If you've read my nail related posts on this blog before, you might know that I openly admit at being horrible at nail art. My nails are usually bare & I hardly have the patience to let one coat of nailpolish dry completely. That's why it seems like the China Glaze Magnetix collection is made for people like me! I mean the concept is simple: apply nailpolish, hold magnet over the damp nail, & seal with a top coat. That doesn't sound too hard, right?


I was presented with the opportunity to try out & review 2 of these nailpolishes + the magnet by NailPolishCanada.com, which is a great site for Canadians who want to avoid paying ridiculous shipping & custom charges. Of course, I wanted to see whether these worked as easy as the concept sounded, so I agreed. When I was picking out the nailpolish shades online, I was not impressed with colours in this collection. I really wish they had brighter or bolder colours, but the two shades that I ended up picking out are Drawn to You & Instant Chemistry.
The night that I opened the package, I tried Drawn to You on one nail right away with the diagonal lines design on the magnet. The magnet was easy to use & I was impressed with the outcome.


 Using the magnet itself wasn't a problem for me since I had read the instructions & watched a tutorial on YouTube. I made sure I worked on one nail at a time & held the magnet over the nailpolish right after applying the nailpolish on my nail. At first I was only holding the magnet over my nail for the recommended 5-10 seconds, but I found that holding the star & chevron design over my nail for 15-20 seconds was a better option. The only problem that I had with the magnet was that at times I held my nail too close to the magnet & some of the nailpolish got on the magnet, so it might take you a while to figure out the perfect distance between the magnet & your nail.

China Glaze Magnetix nailpolish in Drawn to You

As with all China Glaze nailpolishes, the consistency & application is nice. I found that Drawn to You wasn't as opaque as Instant Chemistry, which might be a little disappointing to some because the magnet works best when you have just one coat of nailpolish on. If you apply a thick coat of Drawn to You, however, it looks fine in my opinion.

China Glaze Magnetix nailpolish in Instant Chemistry

As for the designs, I knew I wouldn't like the star design as much even before I tried it & I was right. Since the design shows up different on each nail, the star design doesn't look as nice when you apply that design on all your nails & I had problems getting it to show up nicely with the Instant Chemistry nailpolish. Another design that was hard to work with, especially with the Instant Chemistry nailpolish, was the chevron design that I had thought I would like the best!

The diagonal lines ended up being my favourite design because the outcome is always sharp & you only have to hold the magnet over your nail for 10 seconds for the design to show up properly. When I tried the diagonal lines design on all 10 fingernails, I couldn't believe how good my nails looked in such a short amount of time. It actually looked like I went to get my nails done! That's definitely a winner right there.


Which nail design do you like best?
Read More »

Thursday, April 19, 2012

Review: Dotting Tool

Since I'm pretty much hopeless at doing my nails, I thought I'd try out the dotting tool from BornPrettyStore.com. I haven't come up with any breathtaking designs yet (haha), but let me show you what I did so far.


I used the dotting tool to make a snowflake design on my nail in a previous post in which I did some nail art using rhinestones. I've tried to do coloured tips with them too & even though it works to do nail tips, it takes too long to get a proper & even line & the tips aren't as smooth.


The cute dotting tools that I was sent for review came in a pack of 5. They are double ended with different sized heads/tip. The tools are easy to work with & the size of the dot will not only depend on which sized head you choose, but also on how much pressure you apply while using the tool. After using it once, I was cleaning the head off with a cotton ball that had some nailpolish remover on it & the whole silver part came off. It happened once again on another head, so I think they need to use stronger glue.

Even though these tools can be handy, they're only worth the $4.74 if you like coming up with creative nail designs or are planning on doing nail designs with a lot of dots. If you'd like to try these dotting tools, click here more information & you can use the code SAIMESEK31 to receive 10% off your order.

Do you do nail designs with a lot of dots? Is this a tool that you would find useful?
Read More »

Friday, April 13, 2012

Glamourizing Browns With Colour

When I started to do my eye makeup today, I knew I wanted to use brown eyeshadows. I started off by applying a lighter brown eyeshadow to the middle of the eyelid & then moved on to applying a darker brown shade on the inner & outer thirds of the lid & above the crease. I could've just left it there & it would have been a fairly simple look, but I decided to glamourize the look by adding colour. The pink goes well with the browns & the blue brought the look to life.

The look would be incomplete without bold, dark eyebrows & thick eyeliner. & of course, false eyelashes added to the whole glam factor as well.


In the picture below, the sun was shining through the window, which made me frown & look like I'm angry. I thought I'd include the picture since you can kind of see how the eye makeup would look on someone with hooded eyes. You have to remember that your eye shape might be different than mine so try to figure out what works best for you!


Products Used:

  • Urban Decay Eyeshadow Primer Potion in Original [lid till under the brow + tear duct area + lower lashline]
  • NYX Cosmetics' Jumbo Eye Pencil in Milk [lid till under the brow + tear duct area + lower lashline]
  • BH Cosmetics eyeshadow in CS01 [middle third of lid]
  • BH Cosmetics eyeshadow in CM02 [inner & outer thirds of lid + crease]
  • BH Cosmetics eyeshadow in MM17 [outer third of lid + outer V + crease]
  • BH Cosmetics eyeshadow in WM08 [inner half of browbone]
  • BH Cosmetics eyeshadow in WM20 [outer half of browbone]
  • Sleek's Paraguaya iDivine Palette - Parfait [under the brow + inner corner]
  • Annabelle Cosmetics' Smudgeliner in Electric Sapphire [waterline]
  • BH Cosmetics eyeshadow in CS18 [winged out on lower lashline + on top of eyeliner in the waterline]
  • BH Cosmetics eyeshadow in CM20 [lower lashline - very close to the lashes + used to fill in the brows]
  • Maybelline Felt Tip Liquid Eyeliner in Black [upper lashline]
  • L'Oreal Voluminous mascara in Carbon Black [upper & lower lashes]
  • False Eyelashes


Which colours would you use to glamourize your browns?
Read More »

Thursday, April 12, 2012

Review: BH Cosmetics Eye Brushes

I've been trying out 3 eye brushes by BH Cosmetics since the beginning of the year and I feel like I've used them enough to be comfortable to review them.

I wasn't sure if I'd like these brushes since I haven't heard much about them & also because they're priced pretty low, which made me wonder about the quality. I'll be reviewing each brush individually, but in general, I experienced very minimal shedding and I've washed these brushes 4 times already. I like that the handles don't have a shiny finish, however, I wish the handles had the names of the respective brushes on them. Also, it would be nice if the bristles were a bit softer.

The comparison pic shows a pencil & MAC 217 brush so you can tell how long the handles are & how big the bristles are.

Regular price: $3.95
"Equipped with impossibly soft, fluffy bristles, this elegant brush seamlessly blends your most glamorous color choices for eyes, cheeks, and brow bones. The ultimate effect? Exquisite" - BH Cosmetics

This brush is my favourite out of the 3. It works best when I'm blending colour on my browbone or above the crease. I've used this brush to apply & blend eyeshadow as a highlight on my cheekbones & on the bridge of my nose as well. Another great use for it is to set my under eye concealer & the concealer around my nose with powder. Even though this brush is multi-purpose, I've grabbed it the most on days when I'm in a rush & just want to add a dark brown eyeshadow to my crease for a bit of definition.
If you're not using a brush guard, its bristles splay a bit after a few uses, but that's the case with most fluffy blending brushes till you wash the brush & reshape it. This brush has only shed 1-2 bristles in the past few months.

BH Cosmetics Smudge Brush
Regular price: $6.95
"Smoldering beauties need just the right amount of glamorous eye shadow smudge. That's why we're so excited about our new smudge brush!" - BH Cosmetics

This is my least used out of the 3, but it happens to be the most dense. It works best to pack on the colour in the crease since it's a small dome shape. I've used it in the tearduct area, but I've found it a bit big for my liking. Personally this brush works well for me when I'm trying to pack on the colour in concentrated areas, but I like to blend the colour out with another brush. The main reason why I don't blend with this brush is because it's bristles aren't as soft since it's a smudge brush & not a blending brush. I mainly use it to pack colour because I prefer smaller brushes when smudging on the lower lashline. I don't smudge the eyeliner on my upper lashline, so I can't say how well this brush would work for that.
This brush hasn't shed at all.

BH Cosmetics Angled Shadow Brush
Regular price: $3.95
"Here's a new angle on beauty: now you can apply your favorite BH Cosmetics eye shadows with sleek precision. This brush's plush, silky bristles, crafted at a jaunty and oh-so-effective slant, make sure of it." - BH Cosmetics

This brush is pretty dense and I've used it the most while doing smokey eyes since it packs on the colour, but I can blend the colour upward with it too. I like using it with dark colours in the outer V because I can easily create a wing with the eyeshadow & use that as a guide. It works really well while packing colour in the crease, browbone, or under the brow. I've also used the tip of the brush to place eyeshadow in the tearduct area & that worked out fine. I like how the angle on the brush isn't too steep so I can use it to place colour in the crease area as well.
This brush shed 1-2 bristles in the past few months.

So those were my thoughts on the 3 brushes. The brushes were sent to me by BH Cosmetics & even though they were probably expecting me to review these a lot sooner, I wanted to test them out a little longer for shedding & quality, but they held up pretty well. As always, my opinions haven't been swayed & I am putting out this review after a few months of testing.
I've already posted a few looks using a customized palette from BH Cosmetics & I will be doing a review on that as well. For now, you can check out the products on their website, Facebook page, &/or Twitter & take advantage of their Birthday Sale (40% off  all 120 eyeshadow palettes).


Anyway, I think I'm just a little biased toward blending brushes in general. They also have a fan brush that I've been eyeing.
What kind of brushes do you like the most?
Read More »

Tuesday, April 3, 2012

Trying Out the Colour Blocking Trend

On my last shopping trip I wasn't in the mood to shop. Instead, while browsing around at Winners, I saw a pink maxi skirt & decided I'll try out the colour blocking trend. I grabbed a few other things & headed for the fitting rooms. Here are the outfits in the order that I tried them on:


The colours are completely off in the pictures because of my phones non-flash camera & the fitting room lights.

I absolutely fell  in love with the first outfit & didn't want to take it off. I thought the outfit was fun & made me look younger. My mum thought it was a bit too circus-y with the yellow top, but it was definitely my favourite combination & the whole outfit is just under $100 (before tax, of course). I've included a little price breakdown of each item in the look.


I ended up buying the jacket since I can't resist a good winter coat, a jacket, or a blazer that fits well. I'm thinking of going back for the skirt & getting either this pink or another beige-ish colour by the same designer.


My phones camera really doesn't do the colours any justice. The green is actually a St. Patrick's Day sort of green & the skirt is a hot/dark pink, not red.

Which outfit do you like the best?
Have you tried this whole colour blocking trend yet? Do you like it?
Read More »

Sunday, April 1, 2012

#marchphotoaday challenge

If you're following me on Twitter or you have liked my Facebook page, you might have noticed that I've been posting images with the #marchphotoaday tag. If you don't know what it is, it's basically a challenge where you snap a picture per day based on the topic/word for the day. More info on the challenge can be found here.


The challenge was an excuse for me to log in to Twitter more & it worked! During March I tweeted more & interacted a lot more with people on Twitter than I ever have before. I've posted my pictures for the month below & each picture is linked to the respective tweet so you can check out the bigger picture &/or what I had to say about it. 


Is this something that you'd be interested in? The list for #photoadayApril is up if you'd like to join in on the fun. Let me know if you plan on participating in the challenge so I can check out your pictures too.
Read More »

Saturday, March 31, 2012

Minimal Makeup

I want to play around with makeup, but I'm trying not to because I have an annoying pimple on my cheek! It's been there for a few days but its getting better since it reached its peak/worse stage about 2 days ago. I'm trying to avoid touching my face, hence this is the first time I've worn makeup in days. A lot of people continue wearing makeup when they get a pimple, but I'd rather leave my whole face alone & not risk touching it more than I have to especially since it's in such a visible spot. So the makeup looks will have to wait for now.


My hair looked like a mess today & I had it up, but I was going out & didn't want to look like I just rolled out of bed so I did something that didn't look like I put much effort into it.  I was only going to apply an eyeshadow in the crease + some mascara, but I decided to smudge some brown eyeliner as well. I've always loved how smudged eyeliner looks on people, but whenever I try it out with black eyeliner it never looks quite right to me. I tried it out with brown eyeliner today & didn't mind it as much.

Products Used:
Eyes
  • Urban Decay Eyeshadow Primer Potion [all over eyelid till under the brow]
  • BH Cosmetics eyeshadow in MM17 [outer V + crease + lower lashline]
  • MAC Powerpoint Eye Pencil in Stubborn Brown [smudged on the upper lashline]
  • L'Oreal Voluminous mascara in Carbon Black [upper & lower lashes]

Face
  • Revlon ColorStay foundation for Combination/Oily Skin in 320 True Beige
  • Annabelle Cosmetics Zebra Bronzing Powder in Haute Gold [used mainly to contour + lightly applied on cheeks]

Lips
  • Rimmel Exaggerate Full Colour Lip Liner in 063 Eastend Snob [lined lips & filled them in]
  • Marcelle Cosmetics Rouge Xpression Creme Lipstick in 853 Jezebel

Do you continue with your usual makeup routine when your skin starts acting up?
Read More »

Tuesday, March 27, 2012

My 1st Apothica.com Haul (Nov 2011)

If you look at my sidebar, there's an ad for an online cosmetics company called Apothica. A few months ago I got a few items from there, so I thought I'd do a little review.  Before I start, I'd like to add that even though the company advertises on my blog, my opinion in this post hasn't been swayed by that.

I had browsed through the site before I let them advertise on my blog to ensure that the site was selling products that I would be interested in purchasing myself & I was pleased with their selection. When it was time for me to purchase, however, I noticed was that a lot of the products could only be shipped within the U.S., which was a bit disappointing. Even though this meant that I couldn't order the Becca Cosmetics Shimmering Skin Perfector that I wanted to try so badly, I still managed to find a lot of things that I wanted to get.
Here are the items that I ended up checking out with:
  • Too Faced Smokey Eye Palette 2011 (I got 2 - 1 for myself & the other as a present)
  • Too Faced Natural Eye Kit
  • Too Faced Shadow Insurance Eyeshadow Primer
  • Too Faced Teddy Bear Hair Mini Brush Set
  • Laura Geller Blush-n-Brighten in Roseberry
  • Yves Saint Laurent Rouge Volupte Lipstick in #25 Soft Beige 
  • Yves Saint Laurent Rouge Volupte Lipstick in #23 Luscious Pink 


I used the coupon code PACK10 for 10% off my purchase + the shipping charge was a little over $25, which brought my total to around $256. I kept checking my account & they took 12 days to just get the stuff together & ship it, which annoyed me a bit. After they sent the items out, it received it in a little over a week. Once the mail lady arrived at my door with the parcel, I also had to pay a little over $27 for customs. If I lived in the U.S. (it takes me 30 minutes to cross the border), I would have avoided the custom charges & the shipping charges as well since shipping to a U.S. postal address is free when your order is over $49. So if I lived in the U.S. I would have saved over $50 & would have probably purchased something else with that money.

Moving on, the items itself were packaged very well & none of them were damaged. I noticed that 2 of the items (the brush set & the Natural Eye Kit) were back-ordered & one of the YSL #23 lipstick could not be shipped so the money for it was refunded. I found it really weird that the site let me check out with the lipstick when it couldn't be shipped to Canada.
The brush set & the Natural Eye kit arrived later. I was upset when I noticed that the eyeshadows had already been swatched before since I could clearly see shimmery fingerprints in the matte eyeshadows. The next morning, I got on the phone & spoke with someone from Apothica & they sent a new palette out right away. The lady on the phone was polite & quick, which I liked.

Once again, I love some of the items on the site & they are priced competitively. If you see an item listed for a lower price on another site, get on the phone & Apothica will match the price for you! Their customer service is great. The negatives are that the wait time after you order items is a bit long if you don't live in the U.S. & that online shopping makes me wish I lived in the U.S. If you're already living there then this would be a good site to shop from.

I plan on reviewing some of the items that I bought, which is why I've just included small pics for now. I thought I'd do a 1st experience/haul post since I advertise their site, so I wanted my readers to know about my experience with the company.
Hope those who are planning on purchasing from Apothica.com found this review helpful.
Read More »

Tuesday, March 20, 2012

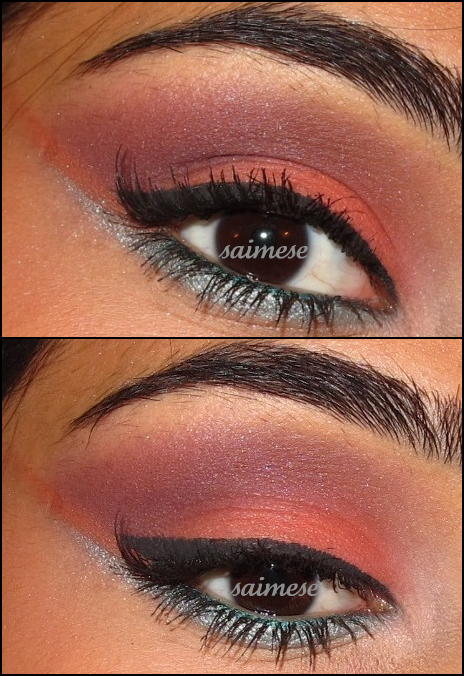
Swarovski Inspired Spring Fun

Spring's here!


I had received an invite in the mail for Swarovski's spring fashion event & I really liked the makeup look for spring. I knew I wanted to try the look & I just got around to doing it 2 days ago.
The picture below is scanned, but if you click the pic it will take you to the picture on Swarovski's site where you can see the look a little better.


Here's the look that I came up with. I used the orange/coral on the lid, darker shade in the crease, light blue on the lower lashline, & lighter colour in the tearduct area. I added a few elements of my own though: winging out the blue & orange + coloured eyeliner on the waterline + a purple-brown shade blended upward & out instead of keeping the dark colour in the center of the crease.

Products Used:
Eyes
  • Urban Decay Primer Potion [all over eyelid till under the brow + tearduct area + lower lashline]
  • BH Cosmetics eyeshadow in WM09 [all over lid + between both wings]
  • BH Cosmetics eyeshadow in CM02 [crease + browbone]
  • Sedona Lace 88 Metal Eyeshadow Palette - light blueish-gray shade [lower lashline]
  • Sleek's Paraguaya iDivine Palette - Sandstone [tearduct area + lightly under the brow]
  • Annabelle Cosmetics Smudgeliner in Atomic Surf [waterline]
  • Annabelle Cosmetics liquid eyeliner in Black Out [winged slightly on the upper lashline]
  • L'Oreal Voluminous mascara in Carbon Black [upper + lower lashes]
  • ES A134 false eyelashes [1 eyelash cut in half & applied on the outer corners of both eyes]

Face
  • Revlon ColorStay foundation for Combination/Oily Skin in 320 True Beige
  • Maybelline's Dream Matte Powder in Honey [only on the t-zone]
  • Annabelle Cosmetics Mineral Powder Bronzer in Terra [used to contour cheeks + jaw + temples]
  • Sedona Lace 88 Metal Eyeshadow Palette - a mix of the cream shades [cheekbones + bridge of nose + under the eyebrow arch]
  • BH Cosmetics eyeshadow in WM09 [cheeks]

Lips
  • Rimmel Exaggerate Full Colour Lip Liner in 063 Eastend Snob [all over lips]
  • Senna Cosmetics Cream Lipstick in Plush
  • Marcelle's Vita-Lip Plumping Gloss in 40 Rio Rose


I actually applied lipstick this time & that too a lighter shade. I used the bold orange eyeshadow on my lids & on my cheeks as well & I'm loving the way orange blush looks on my skin tone.


I can't believe I haven't tried an orange blush yet considering how popular it seemed to be last spring/summer. After seeing how good orange looks on my cheeks, I definitely need an orange blush in my life. I'm thinking Rome by Cargo Cosmetics.
Got any recommendations for an orange blush?

Lots of bright colours & vitamin D ahead ;)
Read More »